Wednesday 27 May 2015

shell stitch for summer top 4

11329793_1586313481625387_5546091105741256339_n
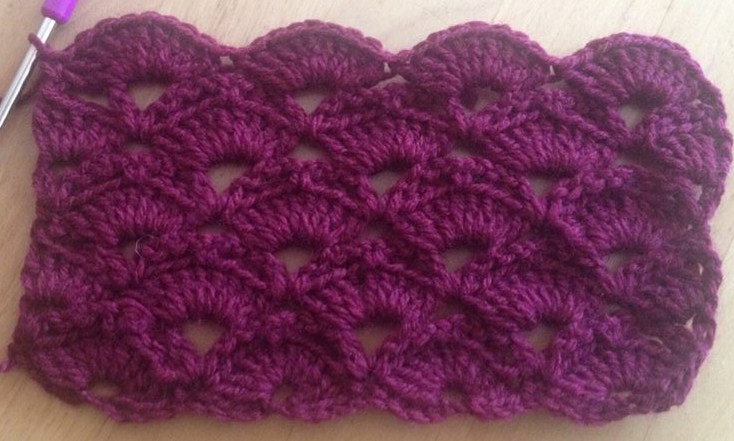
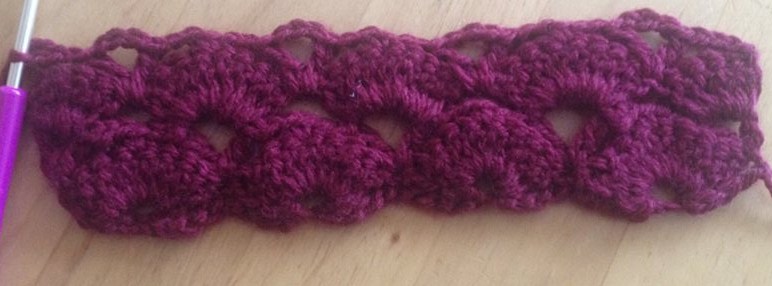
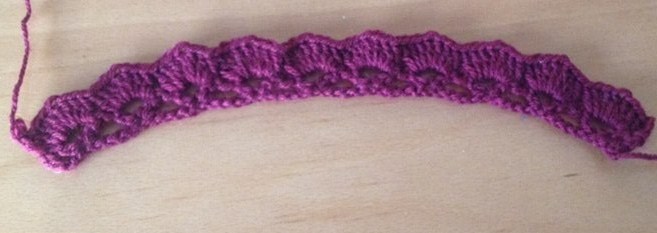
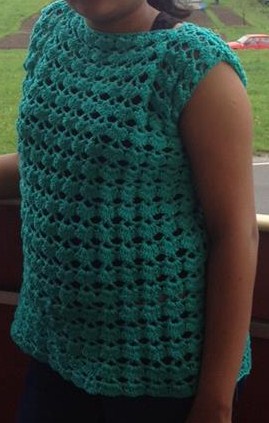
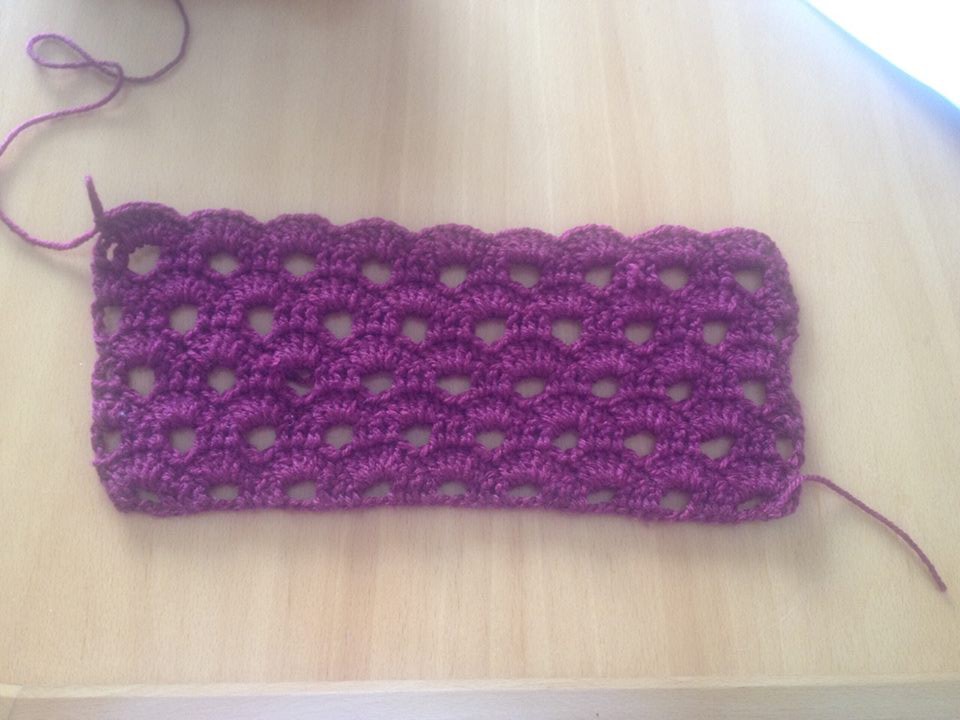
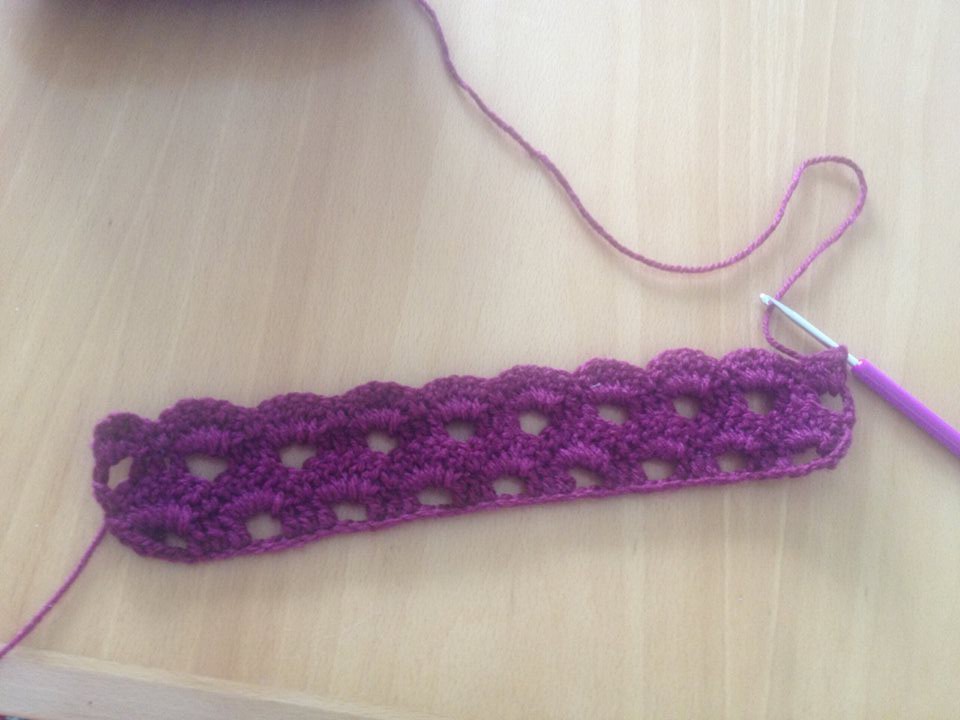
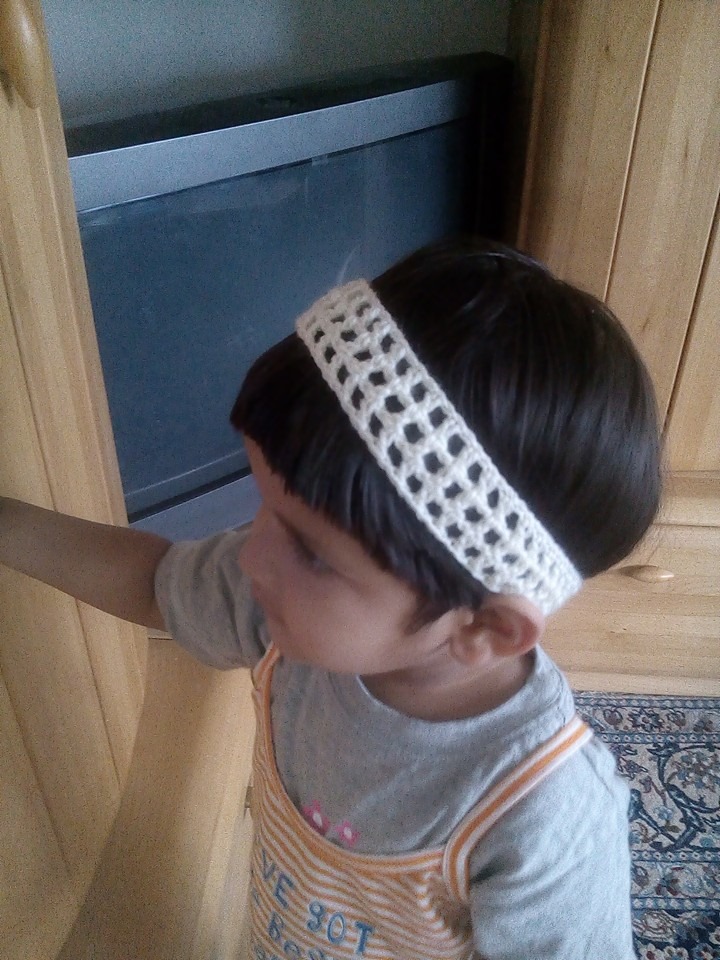
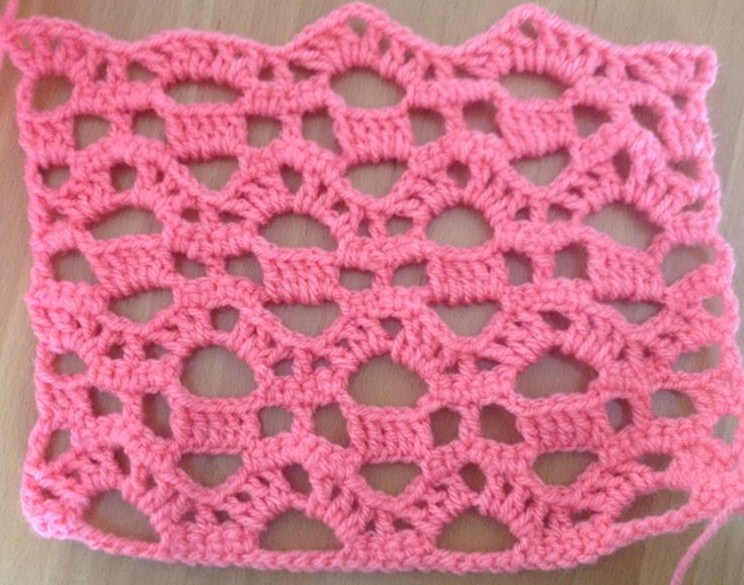
Hi, everyone this is the 4th variation in our shell stitch pattern for summer top series, this pattern can be used in making summer tops, shawls, scarfs, and many more.
Here is a step by step tutorial for this pattern
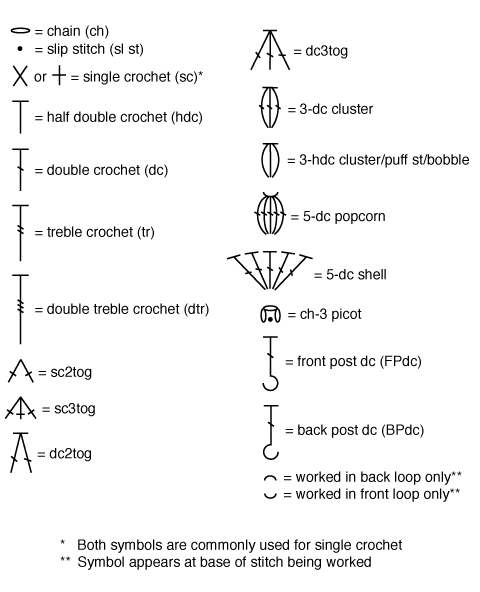
abbreviations:
Ch – chain
Sc – single crochet
dc – double crochet
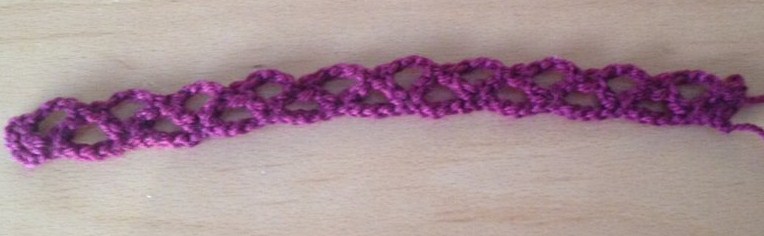
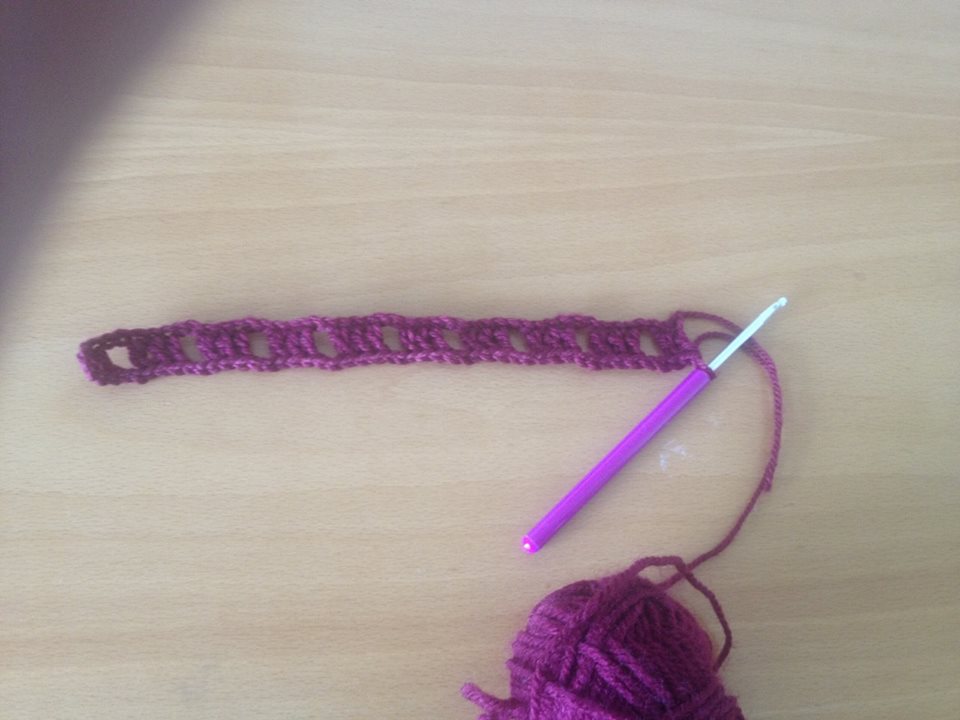
This pattern is multiples of 10 +1 ch
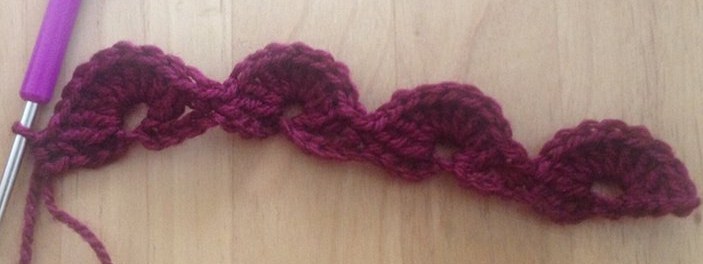
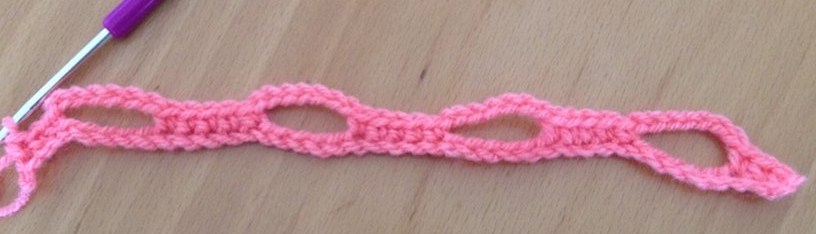
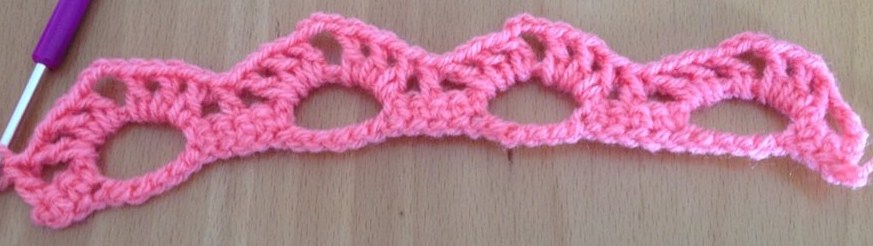
Row 1 – sc into the 3rd ch from the hook and sc into the next st,  ch 7 skip 5 ch and sc into the next ch and sc into next 4ch, ch 7 skip 5 ch and sc in next 5 ch continue till end of the row. Row ends with 3 sc in last 3 ch
11052490_1586313294958739_4438005055164758298_n
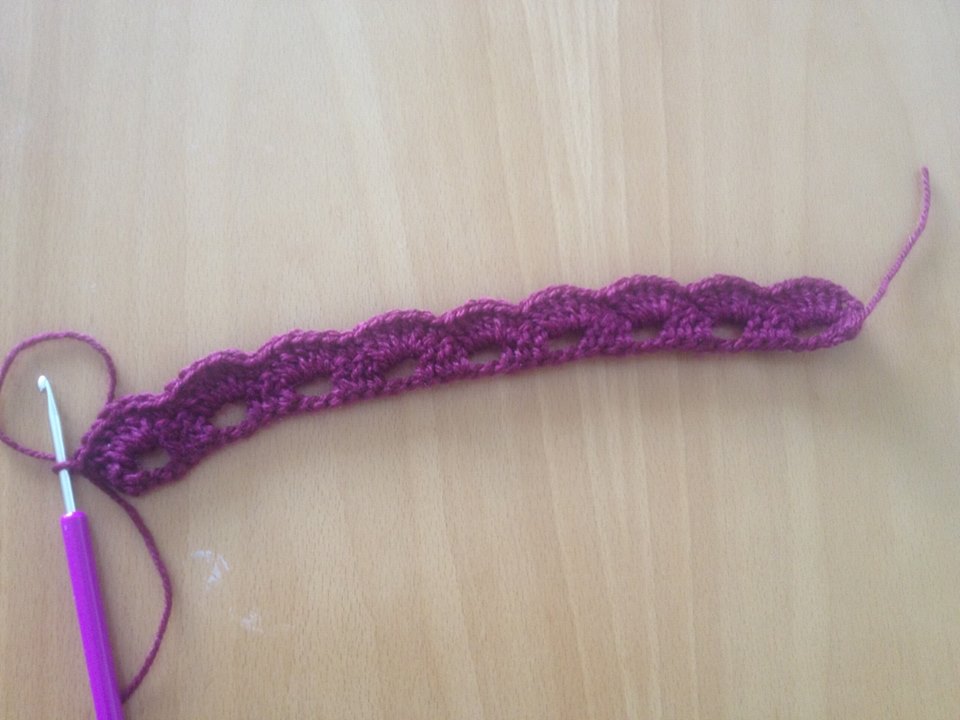
Row 2 – ch3 (1dc, ch1,1dc, ch1, 1dc,ch3 1dc, ch1,1dc,ch1 1dc) into the ch7 space idc into the 3rd ch of previous row 5sc set, continue till the row ends
10407808_1586313304958738_574488186980938230_n
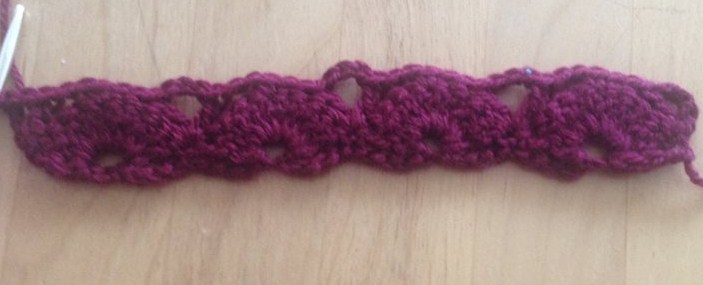
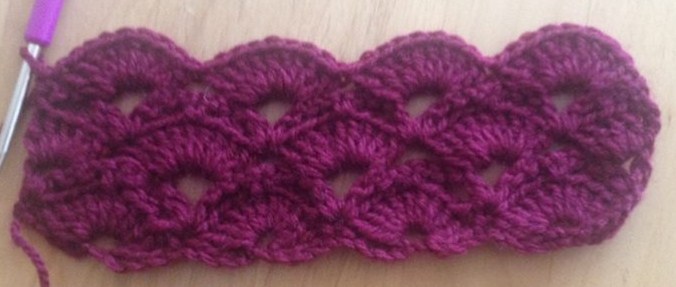
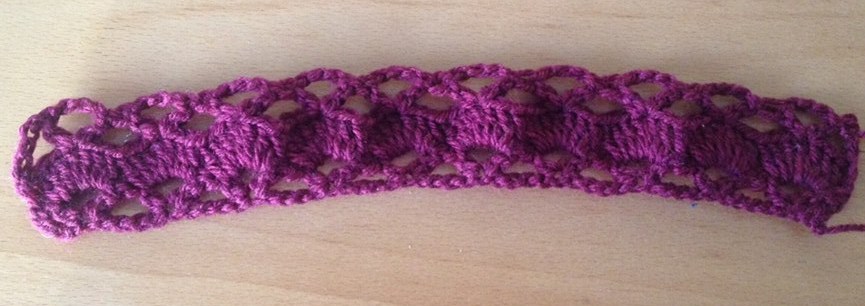
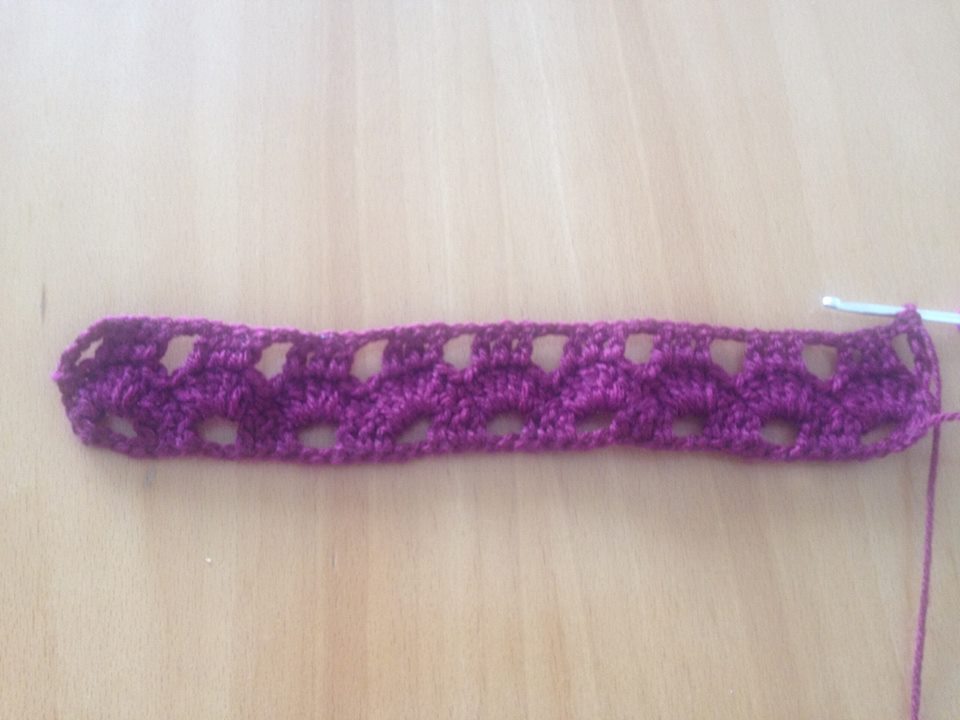
Row 3 – ch 5 , sc into the 2nd sc in the shell and in next 7sts , ch5 and continue till end of the row row ends with ch2 1dc into the beginning st of the previous row.
1619576_1586313324958736_8478189886813627037_n
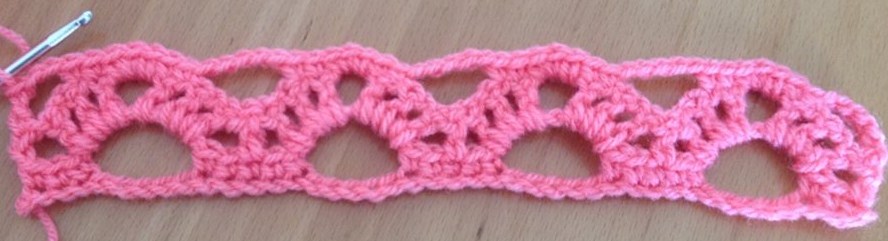
Row 4 – ch 3 2dc into the same space, ch 3 1dc into the 4th st of previous row 7sc set, ch 3 5dc into the ch 5 space and continue till end of the row. row ends with 3dc.
10418520_1586313344958734_3916956627061350831_n
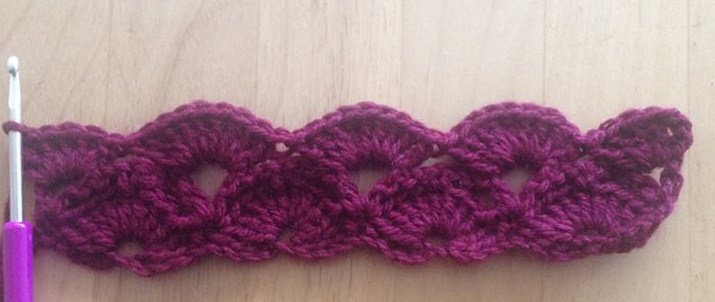
Row 5- ch6 skip 3dc set of previous row 2sc into the ch 3 space , 1sc into the dc of the previous row, 2 sc into the ch3 space, ch 7 skip 5dc set and into next ch3 sp 2 sc, 1 sc on dc and 2sc into next ch3 space continue till the end of the row. row ends with ch 3 1dc into the 3rd ch of the beginning st of the previous row
22210_1586313378292064_5750795281629460144_n
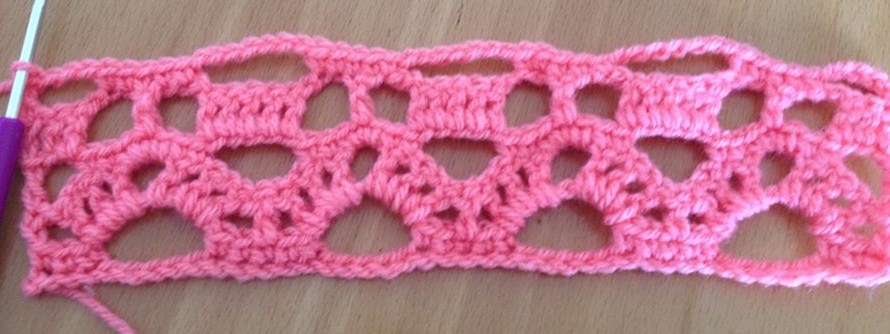
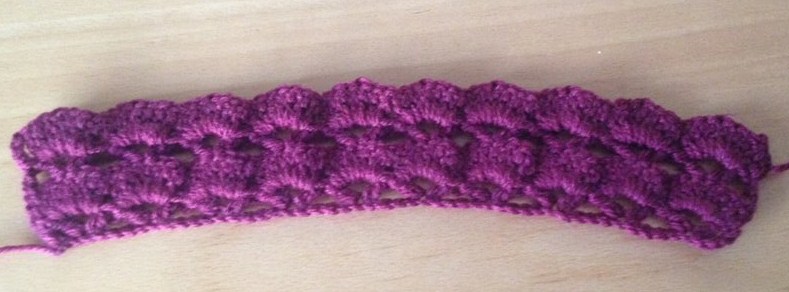
Row 6 – ch4 1dc ch1 1dc,ch1 1dc into the same space 1dc into the 3rd st  of the 5sc set of the previous row, it is same as row 2 till the end of the row. Row ends with 1dc,ch1.1dc.ch1.1dc.ch1.1dc
1900180_1586313408292061_6458153638933712027_n
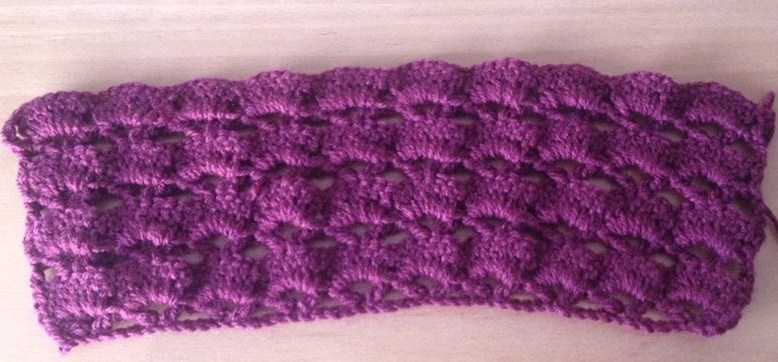
Row 7 – ch1, 1sc into next 4 sts ch 5,  sc into the 2nd ch1 in the shell and next 6 ch continue till end of the row and the row ends with 4 scs
11113702_1586313438292058_2809235140545924197_n
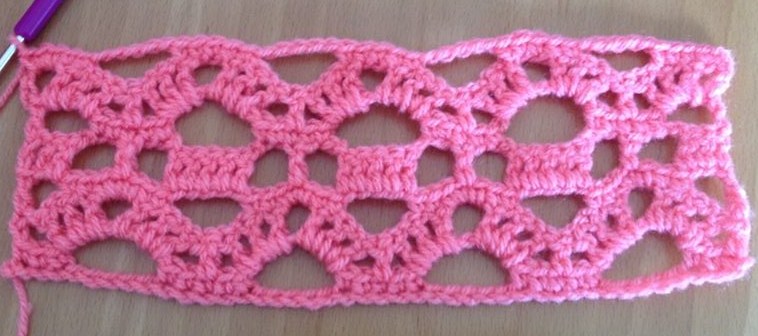
Row 8- ch6 5dc into the ch5 space ch3 1dc into the 4th ch of the 7sc sets of the previous row, ch 3 5 dc into the ch 5 space continue till the end of the row. row ends with ch3 1 dc
11148755_1586313464958722_1431956568151666421_n
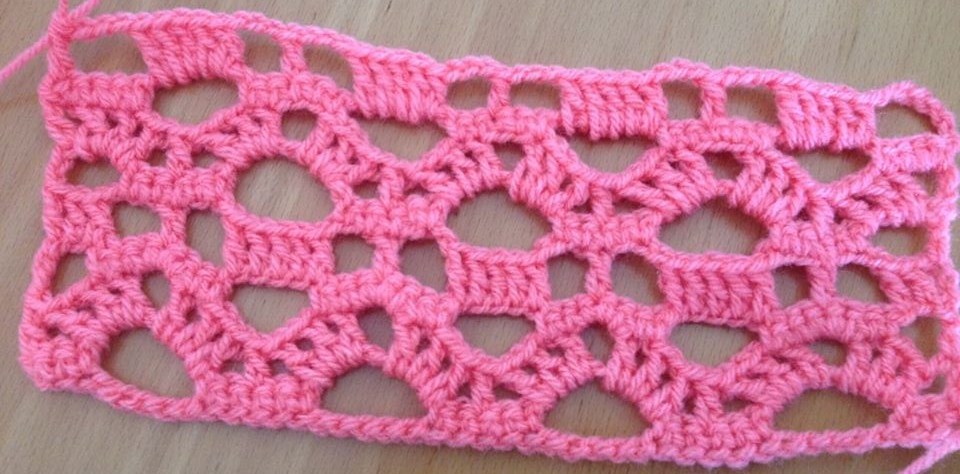
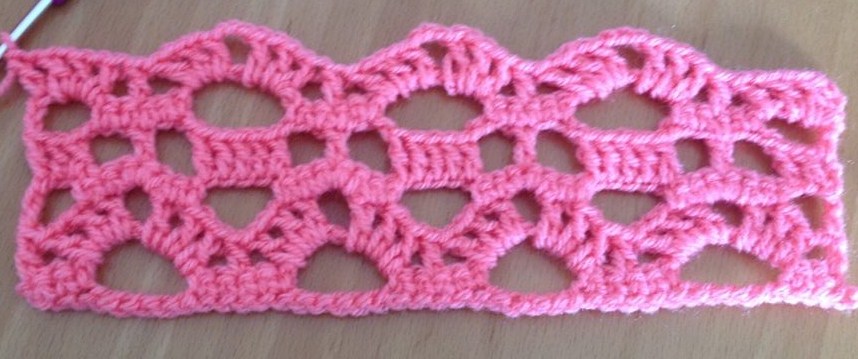
repeat row 1,2,3,4,5,6,7,8, till you reach the required measurement.
Hope you enjoyed the pattern . If you have any doubts please feel free to write it in the comment box, if you like the pattern share it .
Happy crocheting

Thursday 21 May 2015

Shell Stitch for summer top 3

11225272_1584079338515468_1447547520006378292_n
This is 3rd variation of shell stitch in our summer top series. This pattern can be used to make summer top, frocks, bolero, shawl, scarf, bag and many more.
Here is a step by step tutorial of this pattern
abbreviations:
Ch – chain
Sc - single crochet
dc – double crochet
special st – 9dc = shell
This pattern is a multiples of 10ch + 1
Row 1 -9 Dc into the 7th ch from the hook,  skip 4ch and sc into 5th ch, skip 4ch into 5th ch 9dc, continue till end of the row.
11060900_1584078061848929_8710949761621917215_n
Row 2 - ch 4, 1 dc into the same st, ch 2 sc into the 5th st of the shell ch 2 1 dc-ch 3-1 dc into the space between 2 shells , ch 2 - sc on 5th st of te shell - ch 2 continue till the row ends , last stitch dc- ch 1- dc .
11053067_1584078071848928_6827802085653313789_n
Row 3 - ch3- 4dc into the same sp, 9dc into the next ch3 sp, and continue till end of the row last sp 5dc.
1610929_1584078095182259_4795455378789830755_n
Row 4 - ch3 dc-ch3dc into the sp between 2 shells, ch2, sc on the 5th st of the shell ch 2 continue till end
11262130_1584078121848923_7760818710977469815_n
Row 5 - ch1  9dc into all the ch3 sps
11295803_1584078201848915_7129362736623552793_n
continue doing row 2,3,4 and 5 till you reach the desired measurement
hope the tutorial was helpful. Please share your thoughts with me in the comments box. Do upload the finished project of this stitch pattern so that others can benefit.
Happy crocheting

shell stitch for summer top 2

10406528_1582533105336758_7840469918956622437_n
This is 1 more shell stitch pattern in our summer top series. This is a easy and nice pattern for summer tops, bolero, shawl, scarf, baby blanket, edging, frock frills etc. here is a step by step tutorial of this stitch.
abbreviations:
Ch – chain
dc – double crochet
special st - 7dc = shell
This pattern is a multiples of 12ch +5ch
Row 1: dc into the 6th ch from the hook, ch3 dc into the same ch skip 4 ch, into 5th ch,dc, ch3 ,dc and continue till end and 1dc into the last ch of the row.
11295755_1582532995336769_5168221067568457169_n
Row 2: ch3 7dc into the ch3 sp and in all the ch3 sp of the row and 1 dc into the last st
10931199_1582533012003434_1693020316462501642_n
Row 3: ch4, into the 4th ch of the shell of the previous row dc.ch3,dc and to all the 4th st of the shell of previous row till the end and 1 dcinto the last st
11222014_1582533032003432_7972128681361188668_n
Row 4: ch3 7 dc into ch3 sp and all the ch 3 sp till end and 1 dc into the last st
11165306_1582533062003429_3534363237174185542_n
continue working row 3 and 4 till the required measurement is reached .
i have a 1 finished project of this pattern and would like to share hereshell st top
hope the tutorial was helpful. Please share your thoughts with me in the comments box. Do upload the finished project of this stitch pattern so that others can benefit.
Happy crocheting

shell stitch pattern for summer top 1

shell tutorial 5
This is a wonderful pattern to use to make summer tops, boleroes, shawls and bags. Easy to make and looks great. here is a tutorial of this stitch pattern how to make.
abbreviations:
Ch - chain
sc - single crochet
dc - double crochet
tc- treble crochet
special stitch- 5dc = 1 shell
This pattern is a multiple of 5 ch + 4ch
Row 1-  dc into the 5th ch from the hook ch2 skip 2 ch and dc in next 3 ch, ch2 skip 2 ch dc into next 3 ch, continue till end.(row ends with 2 dc)
shell tutorial 1
Row 2- ch1 5dc into ch2 space, sc into 2nd dc of the previous row, 5dc into next ch2 space, continue till end of the row.
shell tutorial 2
Row 3 - ch5, dc into the 2nd, 3rd and 4th st on the shell, ch2, dc into 2nd, 3rd, 4th st of the shell and continue till end of the row. (row ends with ch1 and tc into the 1st st of the previous row).
shell tutorial 3
Row 4 - ch3, 2dc into the same ch space, sc into the 2nd st, 5dc into the ch2 space and continue till end of the row.(row ends with 3dc into the last ch space).
shell tutorial 4
Row 5 - ch3 dc into the next st , ch2 dc into 2,3,4 st of the shell , ch2 continue till end of the row. (this row looks like row 1)
continue doing row 2, row 3, row 4 and row 5 till you reach the required measurement
shell tutorial 5
hope you liked the pattern. Please share your feedback in the comment box, click like if you like the tutorial and share it.

how to read a diagram pattern

In this post I am going to explain how to read a diagram pattern. Many of the beginner crocheters face problem while reading the diagram. But trust me it is not a difficult task at all. Once you learn how to read the diagram then you deny to read a written patterns and video patterns, and after learning to read the diagram you can make wonderful patterns that are available on the internet.
Let me show you the stitch pattern mentioned in the diagram
diagram reader
Note:I found this pic from pinterest and i am sharing .
let me read an example diagram for you, that may help you reading the other diagams
tunique-24-jpg
Note: picture mentioned here is from internet and it is just for example purpose. I do not have any rights on this picture.
Abbreviations
ch - chain
sc- single crochet
dc- double crochet
tc- treble crochet
tc tog- treble crochet together
sl st - slip stitch
ch6 and sl st into the 1st ch and form a ring
round 1: ch4, 1dc and ch1 11times into the loop and join the round with the sl st into the 3rd ch of the beginning st
round2 : ch5 and sl st on top of the dc of the previous round repeat till you have 11 ch5 loops, ch2 and dc into the 1st ch of the begging st to complete the round
round 3:ch5 and sl st into the 3rd ch of the ch5 space of the previous round, repeat till you have 11 ch5 loops, ch2 and dc into the 3rd ch of the beginning st
round4: 2 tc tog into the same st 2 tc tog into the 2nd and 3rd ch of the next ch5 space,ch6 2tc tog into 4th and 5th ch of the same ch5 space continue till end of the round, in the last st ch2 and dc into the ch of 2tc tog
round5:ch8 sl st into 3rd ch of the previous round ch6 space, ch9 sl st into the 4th st of the same ch6 space, ch8 sl st into 3rd ch of next ch6 sp, ch 8 sl st into the 3rd ch of the next ch6 sp ,ch 8 sl st into the 3rd ch of the next ch6 sp ch9 sl st into the 4th ch of the same ch6 space continue till the end. in the last st ch3 dc into the 1st ch of the beginning st to complete the round
round 6: ch9 sc into the 4th ch of the ch8 space of the previous round,  4 tc into the ch9 space of the previous round, ch4, 4 tc into the same space and sc into 4th ch of the next ch8 space, ch9  and continue the same till end of the round and fasten off.
I hope this information may help you to follow the pattern any doubts feel free to mention in the comment box.

Quick and easy headband

dc headband
This is a very quick and easy headband pattern, can be made to all ages
crochet hook used by me: 3mm
Abbreviations
ch - chain
dc- double crochet
sl - slip stitch
this pattern is a multiple of 2chs+ 3+1
row1: dc into the  4th ch from the hook and ch 1 skip 1 ch and dc into the next ch similarly work till the end and end with the dc
row 2& row 3: ch4 for turning the work counts as 1dc+ 1ch and continue doing like row 1 and fasten off.
join both the ends by sl sts and the headband is ready. If you wish to add flower you can sew or else you just leave as it is.

Angry bird scarf pattern

angry bird scarf
This is a simple scarf to make for your little sons who like Angry Bird cartoon.
Abbreviations
Ch - chain
Sc - single crochet
Dc - double crochet
sl - slip stitch
st - stitch
yarn colours used red, white, orange and black
Using red colour yarn ch 21 + 3
row 1: dc into every ch st till end
row 2 : ch3 for turning st and dc into every st till end
repeat row 2 till 60 rows or till the yarn ball ends or till you reach the desired length  and fasten off
joining white colour yarn make 2 rows of dcs on both the ends.
for eyes:using white colour yarn make a magic ring n sc 8 into the loop and join with a slip st.
make 2 sc into each st of the previous row and join with a sl st and fasten off.
using black colour yarn , pull the yarn to the upside of the eyes holding on the scarf and make 3-4 knots n pull the yarn to the downside and knot holding both the strands and cut the yarn, weave it.
for eyebrows : ch 11 and dc into the 3rd ch from the hook, dc in next 2 ch, hdc into next 3 ch and sl st into the rest of the ch and fasten off.
for Nose: Using orange colour yarn ch 7 and sc into the 1st ch from the hook and sc in all the chs till end of the row, do not add a turning ch just sc into the 2nd st and throughout similarly in all the rows till you are left with 1 ch, then fasten off and triangle is formed for the nose.
sew the nose and eyebrows as shown in the picture.
Tada your angry bird scarf is ready

How to make A Shell stitch head band with double layered flower

nidhi headband pic
This is a simple and beautiful headband, easy to make for all ages
ch- chain
st- stitch
Sc- single crochet
dc- double crochet
sl- slip stitch
hook size used 4.5mm
This pattern is a multiples of 4 ch + ch3
ch3 is considered as turning double crochet
row1 : 3dc into the 4th ch from the hook, skip 1ch and sc into next st,skip 1ch and 4dc into next st, continue till end and into the last st 4dc+ 4dc and turning to the otherside  and continue the work till the begining st. join with sl st into the 3rd ch of the begging st and fasten off.
joining the elastic: insert a yarn n work sl st to fix elastic to both the ends.
flower: ch4 and sl st into the 1st st to form a ring, ch6 and dc into the loop, ch3  dc into the loop till u have 7 ch spaces and ch3 sl st into the 3rd ch of the begging st.
round 1: sc into the 1st ch3 space 1hdc 3dc 1hdc 1 sl st into the same space, continue the same work in all the ch3 spaces join the round by sl st into the sl st of 1st ch3 space.
round 2: keeping the flower upside down sl st into 1st ch of the last round begging st. ch 5 and dc inserting the hook below the 2nd dc of round 1 and pull the yarn and complete the dc, ch5 dc through all the dcs of previous round ch5 and sl st into the 1st ch of the begging st of the 2nd round, sl st into the 1st ch5 sp 1hdc, 5dc, 1hdc, sl st into the same ch space continue till the end of the round and finish by sl st into the sl st of 1st ch space and fasten off.
optional: sew a button in the middle of the flower
sew the flower to any side of your choice and complete the headband